
Results 61 to 80 of 110
Thread: 1974 Chevrolet Corvette L-82
-
08-22-2011, 06:26 PM #61Veteran


- Join Date
- May 2006
- Location
- Arizona
- Posts
- 12,557
That was a Jet rebuild? Ouch.
Over the years I've gotten to really like the Q-jets. I raced our 70 formula in pure stock for several years and learned alot of tricks from other guys in the class. A few drilled holes here and there, some tricks in the float bowl so it holds a bit more fuel and some other tinkering got the Q jet to work beautifully. I now do the same tricks on my other Q jets.
Hey I thought that was an L-82 vette. What's the deal with the center bolt valve covers, they didn't have that in 74,,,lol.
-
08-22-2011, 06:30 PM #62Veteran
- Join Date
- May 2006
- Location
- Arizona
- Posts
- 12,557
Haha, nevermind, i see that's a vortec style intake for vortec heads. Appears you switched some things around trying to be sneaky

-
08-22-2011, 06:31 PM #63Veteran

- Join Date
- Feb 2009
- Location
- Mansfield, PA
- Posts
- 22,146
Black & Blue- '02 WS.6 / '07 Suburban
Busted.
 At the time we built the engine, Scoggin-Dickey was having a hell of a sale on Vortec heads. I just couldn't pass them up even thought it required switching over to center bolt covers. I flirted with the idea of installing the adapters that allow regular perimeter style covers, but was afraid of them simply leaking all over the engine. The engine is therefore a hybrid of sorts.
-
08-22-2011, 06:36 PM #64Veteran
- Join Date
- May 2006
- Location
- Arizona
- Posts
- 12,557
I would have given the adapters a shot, since I believe in 74 on the L-82's GM was still using those sexy aluminum finned covers, which are similar to what is used on our 69 Z28. Great looking covers.
-
08-23-2011, 05:45 AM #65Member

- Join Date
- May 2008
- Location
- Formerly NYC. Strong Island now!!
- Age
- 36
- Posts
- 641
White- 1999 Transam WS6
Damn! Jeff, you have all the coolest cars!
I love those Vettes.
-
08-23-2011, 07:04 AM #66Veteran
- Join Date
- Feb 2009
- Location
- Mansfield, PA
- Posts
- 22,146
Black & Blue- '02 WS.6 / '07 Suburban
 Originally Posted by Firebirdjones

I actually am not sure what the stock covers were on the car -- it had a reman motor when I pulled it equipped with aftermarket chrome valve covers. I agree, the finned stock covers are sweet, but I thought they stopped using them in '72 or '73? Have to check my assembly manual to be sure though.
Originally Posted by Aetos
Thanks, but this one is Dawn's.
-
08-23-2011, 12:21 PM #67Veteran
- Join Date
- May 2006
- Location
- Arizona
- Posts
- 12,557
I wouldn't steer you wrong Jeff. 74 was the last year for the finned aluminum covers. The 74 Z28 also got the same L82 engine the vettes got that year, and I know for a fact that 74 Z's had the covers, so I'm pretty certain your vette should have had them too. Originally Posted by pajeff02
74 Z28 was also the last year they used that cool dual snorkel air cleaner that was first seen in 1970. It was used on the Z28 from 70-74 but the vette only used it from 70-72, in 73 the vette nose changed along with the hood, and went to a cold air package and different air cleaner, as you well know, your vette should have that too.
May have still been a dual snorkel base early on though.
The L82's were a pretty sweat engine for 74 even though the HP rating dropped, it still had alot of good stuff inside. It's basically an exact copy of the L46 350/350 hp used in the vettes in 1969. The only difference was 11:1 compression in the L46 verses 9:1 in the L82.
The L82 used the same camshaft as the 350 HP version.....224/224 at .050 and .450/.460 lift on a 114 lsa. The L82 even had a nice set of 2.02/1.60 valve heads with screw in studs and guide plates but they had 76 cc chambers that dropped the compression. L82's were the sleeper engines of the mid 70's.
What's funny, is GM still uses that same L46 camshaft today in their 350/330 HP crate engines which ironically have vortec heads on them. A little food for thought.Last edited by Firebirdjones; 08-23-2011 at 12:39 PM.
-
08-23-2011, 04:44 PM #68Veteran
- Join Date
- Feb 2009
- Location
- Mansfield, PA
- Posts
- 22,146
Black & Blue- '02 WS.6 / '07 Suburban
FBJ -- you are a walking automotive encyclopedia!
 Thanks for the info!
-
08-23-2011, 04:50 PM #69Veteran
- Join Date
- May 2006
- Location
- Arizona
- Posts
- 12,557
Na, I'm just full of useless information
-
08-26-2011, 01:05 PM #70Veteran
- Join Date
- Feb 2009
- Location
- Mansfield, PA
- Posts
- 22,146
Black & Blue- '02 WS.6 / '07 Suburban
I am going to declare the problem solved. I dropped the carb back on last night and went for a short ride. It idled fine and drove great. Took the car to work today and had to run all over the place -- probably around 40 miles total with lots of idling in traffic and stop and go stuff. She ran perfect and never stumbled or stalled. The three things that I fixed were cleaning the dirt and grime out of the vacuum source in the baseplate, removed and replaced the epoxy in the well adjacent to the primary, and re-set the float height to 3/16". It had to be almost 3/4" when I took the carb apart, so it was way too low. I cleaned and blew out all the vent and fuel tubes and orifices with carb cleaner and compressed air. I also applied a little thread paste to the mixture screws to seal them and added two small washers to tighten up the spring tension on the screws. On startup, I set the base mixture to 2-1/2 turns out and then added about another half turn out while monitoring the idle. I'll do some more fine tuning next week.
-
08-29-2011, 05:57 PM #71Veteran
- Join Date
- Feb 2009
- Location
- Mansfield, PA
- Posts
- 22,146
Black & Blue- '02 WS.6 / '07 Suburban
Had to go look for an initial setup spec on the Adjustable Part Throttle (APT). Unless I missed it, my Q-jet book does not cover this other than to mention that '75 and later carbs were equipped with this adjustment. Looks like the spec calls for two (2) turns out from fully seated. I'll have to go check, but I believe mine is set too low right now.
-
08-30-2011, 09:31 AM #72Veteran
- Join Date
- May 2006
- Location
- Arizona
- Posts
- 12,557
Jeff, I believe you are talking about the little screw in the top of the air horn that adjusts the front metering rods up and down. Too low of a setting would cause a lean part throttle condition that may or may not cause a stumble or backfire.
I modify all my quadrajets to incorporate this little tuning feature, so you can fine tune part throttle AFR's. Works great on both my 70 formula 400 and my 79 pickup I just installed a 502 in.
I think you are right, that 2 turns out is the common setting, but I never followed that. I use the wideband and drive around. I try to shoot for a leaner part throttle setting to squeak a little more gas mileage out of it while cruising. Also helps me since I'm living at 5,000 ft altitude and I'm driving down the mountain all the time.
Playing with the power piston spring will also make changes that affect the screw setting. I'm not sure which power piston spring you are running, but they are made in different colors to signify which vacuum opening rate they have. Every engine is a bit different but I find the orange spring a good starting point. Once you find a spring that works with your combo, you shouldn't have to change it ever again unless the configuration of the engine changes. From there it's as simple as using the wideband to set the screw.
You can buy a bag of assortments through GM, I'd have to dig out the part number for you.
Quadrajets are great carbs with a very fine metering system. Once they are dialed in they are hard to beat. And that's coming from a die hard holley guy.
-
08-30-2011, 09:48 AM #73Veteran
- Join Date
- May 2006
- Location
- Arizona
- Posts
- 12,557
Here is a picture of a few of the assortments I have. You should be able to make out the part numbers and their respective vacuum readings.

You would have to measure your vacuum reading while idling hot, and in gear. What ever that might be depends on your engine and the camshaft you have. Select a spring that is just under that reading by 2-3 inches.
The orange spring (bag on the right) starts to open at 8 inches and works with some of the milder camshafts.
What Jet put in there for you is hard to say. But it affects the screw setting which is why the common "2 turn out" may not be accurate.Last edited by Firebirdjones; 08-30-2011 at 10:03 AM.
-
08-30-2011, 02:29 PM #74Veteran
- Join Date
- Feb 2009
- Location
- Mansfield, PA
- Posts
- 22,146
Black & Blue- '02 WS.6 / '07 Suburban
Damn again, FBJ! Good info and much appreciated. I don't recall any color on the power piston spring -- think it was simply a plain silver. Right now everything seems to be working great. Good transitions from off idle to cruise and instant response to throttle input. I do need to get my wideband on it, but first have to weld a bung into a collector. Raising the APT idled it up a bit so I need to run through my settings again. I'll keep tweaking on it, but right now it is the best the car has run since the restoration was completed. When I was working on the Q-jet for the Olds, I ordered quite a few parts from these guys: Quadrajet Carburetor, Rochester 2G Rebuilding & Tuning Parts & Tools One thing I would like to find is a tool that fits the seat -- I hate using the "double screwdriver" method.
-
08-30-2011, 03:24 PM #75Veteran
- Join Date
- May 2006
- Location
- Arizona
- Posts
- 12,557
If you raised the meter rods (the screw) and the idle came up, then that's an indication the engine likes the richer mixture, much like idle screws do the same thing.
You'll have to find that happy spot with the wideband. If you really want to get nit picky on tuning it I can send you one of each of these springs and label them as to what they are because I am sure these part numbers are discontinued by now. You would need extra air horn gaskets as it would require taking the top on and off a few times. If you are good you can do it without tearing the gasket and reuse it a few times.
Tuning these things is a lost art anymore. If your Quadrajet supply parts place you found is good, they should have those springs as well as other trick parts like larger diameter needle and seats,,,,,oooops I let that one slip
Quadrajets have such a small float bowl it's easily sucked dry on long WOT runs on a thirsty engine. To help combat that there is a larger diameter needle and seat to install to fill the bowl faster. They also make smaller floats that don't take up so much room in the float bowl. Larger floats dispurse the full and cuts down on the amount the bowl can hold. All tricks I learned in pure stock class when a stock fuel pump was all we were allowed to run. So you find other ways around it.
I told you I was full of all kinds of useless information
-
08-30-2011, 04:34 PM #76Veteran
- Join Date
- Feb 2009
- Location
- Mansfield, PA
- Posts
- 22,146
Black & Blue- '02 WS.6 / '07 Suburban
I was reading up on Q-jet tuning tonight in the garage. Many of the tips mentioned in the book, and by you, have been included by JET in their build. I was checking out all sorts of stuff. The only thing I am stumped on are the plugged wells in the main body. On each side of the primaries there is a well that has about a 1/8" hole in the bottom of it. JET had these both epoxied closed, albeit quite poorly on one side, and I am uncertain what their original function was.
-
08-30-2011, 04:58 PM #77Veteran
- Join Date
- May 2006
- Location
- Arizona
- Posts
- 12,557
Those plugs access the secondary fuel passages. A common modification is to remove those plugs and take about a .200 drill bit and drill the fuel supply passage larger. Stock is usually around .150. Bigger passage supplies more secondary fuel. It's a little tedious to remove the plugs without damaging the main body. Originally Posted by pajeff02
What Jet probably did was just drill through the plug as a quicker way to do it, and then just epoxy the hole shut. So evidently it sounds like they have enlarged your secondary fuel supply passage. That's a good thing.
-
09-03-2011, 02:03 PM #78Veteran
- Join Date
- Feb 2009
- Location
- Mansfield, PA
- Posts
- 22,146
Black & Blue- '02 WS.6 / '07 Suburban
Tackling a few other issues and hit a wall with the temp sender. I thought I had selected a sender during the original build that was compatible with the stock gauge, however, it has always read cool. Testing it with an ohm meter confirmed that it is not the correct sender. I went to NAPA and picked up the correct sender, tested it to confirm it was a match, but then found that the Vortec heads are 3/8"-NPT and the new sender is 1/2"-NPT. Researching this on the web revealed that there is apparently not a 3/8"-NPT sender on the market that matches the output needed for the stock gauge.
Figured that this was not a problem as I will just move the sender up to the intake. After several tries, including the careful application of fire, the plug in the manifold will not budge. As I really don't feel up to pulling the intake, looks like I am going to try the adapter route and see what kind of result I get by comparing the reading with my laser temp gun. Nothing has ever been easy on this car...
-
09-04-2011, 05:28 PM #79Veteran
- Join Date
- Feb 2009
- Location
- Mansfield, PA
- Posts
- 22,146
Black & Blue- '02 WS.6 / '07 Suburban
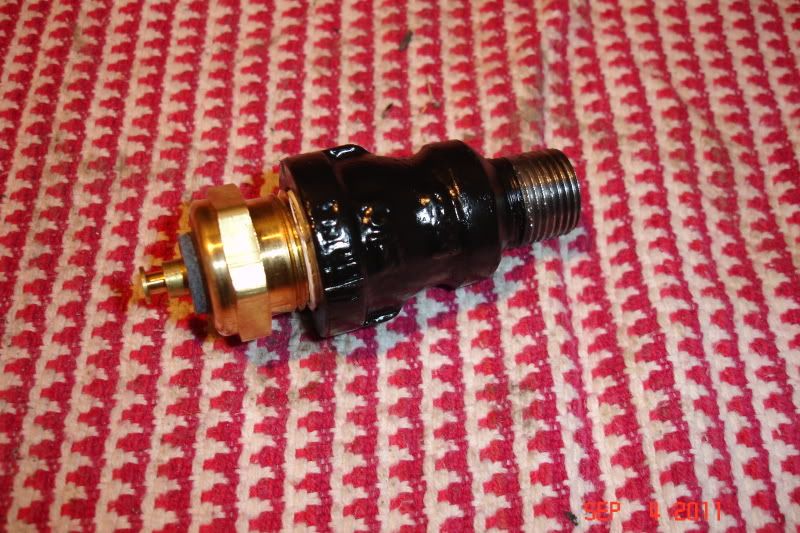
Well... this is what I came up with for an adapter after not being able to find an off-the-shelf solution at Lowe's. I need to go from a 3/8"-NPT hole in the head to 1/2"-NPT for the sensor. I purchased an adapter this size and then turned out the threads on the small side with my lathe. This opened it up to allow water to better reach the business end of the sender. I then took a short piece of 3/8" pipe and cut off one end about 1/4" from the threads. Using a washer to close the gap, I stacked the pieces and then clamped them to a small table for welding. I ran the weld bead around the perimeter and worked it back and forth to bridge the joint. After it cooled, I chucked it back up in the lathe and turned the weld down to form a smooth transition. A little shot of paint and this is what I ended up with:
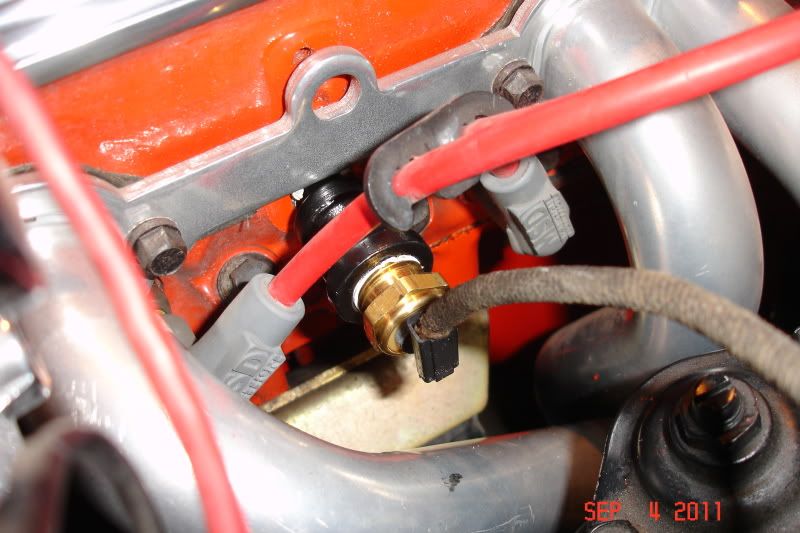
The sender is installed at a slight angle due to the side of the head so any air should easily percolate out and result in the tip being totally immersed in coolant. I started buttoning things back up tonight but need to fire the engine to finish filling the system with coolant. Since she isn't exactly quiet, I decided I had better wait until tomorrow morning.
-
09-04-2011, 06:23 PM #80Veteran
- Join Date
- May 2006
- Location
- Arizona
- Posts
- 12,557
Nice job. That's alot of work for a sending unit.
I ran into a similar problem when I swapped the 6.0 in my 72 blazer. I simply just drilled the head and tapped it for the size I needed. But aluminum heads are a little easier to work with, especially since I had the engine out of the car, not so easy to do when the engine is sitting in a corvette.

 Reply With Quote
Thread Information
Users Browsing this Thread
There are currently 1 users browsing this thread. (0 members and 1 guests)
Similar Threads
-
1974 Chevrolet Chevelle - Rides
By Ed Blown Vert in forum Classic MuscleReplies: 0Last Post: 06-14-2012, 04:30 PM -
1971-1974 Chevrolet Corvettes - Remember When...
By Ed Blown Vert in forum CorvetteReplies: 0Last Post: 05-18-2010, 02:50 AM -
1971-1974 Chevrolet Corvettes - Remember When...
By Ed Blown Vert in forum CorvetteReplies: 0Last Post: 05-11-2010, 01:20 PM -
FS: 1974 Corvette
By Tonik in forum Vehicles For Sale / TradeReplies: 2Last Post: 04-03-2007, 06:12 AM -
1974 Chevrolet Chevelle Malibu Classic
By golem72 in forum Vehicles For Sale / TradeReplies: 3Last Post: 03-10-2006, 01:21 PM

Bookmarks