

Results 101 to 120 of 292
-
12-04-2010, 06:48 AM #101its short but its skinny.


- Join Date
- Oct 2009
- Location
- The Woodlands/spring/houston
- Posts
- 2,142
pewter- 99 trans am
thats what i meant...stock appearance Originally Posted by pajeff02

Last edited by pajeff02; 01-15-2011 at 04:28 PM. Reason: Corrected displacement.
-
12-14-2010, 04:25 PM #102Veteran

- Join Date
- Feb 2009
- Location
- Mansfield, PA
- Posts
- 22,146
Black & Blue- '02 WS.6 / '07 Suburban
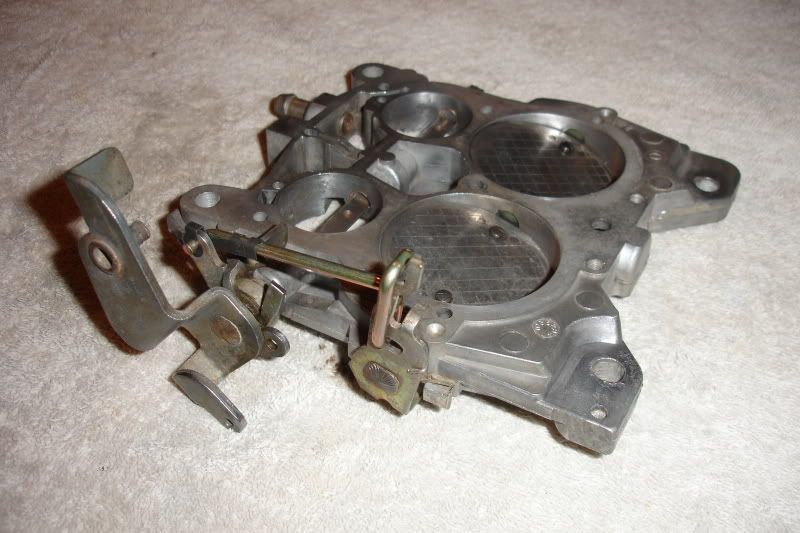
Been plinking away at the carb rebuild. Have everything cleaned up and ready to go. Two other issues were a busted throttle plate screw on the primary shaft and the secondary linkage broke when I bent it back into shape. I was able to center drill the broken screw and as I stepped up the drill bit size it released -- no harm to the threads. Phew!
In order to remove the primary shaft for installation of the bushing kit, I had to bend the rod for the secondaries to unhook it. Unfortunately, bending it out and then back in fatigued the metal and it snapped. I sourced a replacement rod from a Q-jet vendor that utilizes a clip to retain it -- no more bending.
Final clean up was performed with lacquer thinner and over 100 Q-tips. I'll use Eastwood's Carb Renew to make it pretty again before re-assembly.
-
12-15-2010, 03:44 AM #103its short but its skinny.
- Join Date
- Oct 2009
- Location
- The Woodlands/spring/houston
- Posts
- 2,142
pewter- 99 trans am
so youre using the origional carb on a stroker? you modding the carb any? i didnt read the whole thread yet.
-
12-15-2010, 08:08 AM #104Veteran
- Join Date
- Feb 2009
- Location
- Mansfield, PA
- Posts
- 22,146
Black & Blue- '02 WS.6 / '07 Suburban
We'll re-jet the carb on the dyno and then once we have it back in the car I will use my LM-2 to dial in the fueling. Originally Posted by jiveass
-
12-15-2010, 06:16 PM #105Veteran
- Join Date
- Feb 2009
- Location
- Mansfield, PA
- Posts
- 22,146
Black & Blue- '02 WS.6 / '07 Suburban
The fight with the Q-jet continued tonight. I started by installing the primary shaft with the new secondary linkage rod. Pretty slick setup that is identical to GM door handle and lock rods from the '60s and '70s.
I was hoping to get the main body and airhorn painted tonight. Instead, I ended up fighting with the seat that the fuel inlet needle rides in. It should simply unscrew, but instead decided to fight all the way out. I tried cutting a deeper notch with my die grinder, but still could not get it to break free. I ended up drilling it and installing an easy out that finally exerted enough force to back it out. I tore up the old seat, but at least the threads were left intact in the main body.

-
12-15-2010, 08:48 PM #106ʢ ൧ ൨ ൩ ൪ ൫ ൬ ൭ ൮Ր Ց Ւ Փ

- Join Date
- Feb 2009
- Location
- Pittsburgh
- Posts
- 9,963
White- 2008 Hummer H3
Wow! The 2 un-like metals aluminum and brass, plus old varnish from leaded gas in the threads can make them interesting to break free.. Rebuild kits used to come with a "sealed" one piece float needle housing with a nut head machined into to the top.. Made life a whole lot easier being able to get a socket on them.. Hopefully you can get the damaged seat to seal.. If not it will leak fuel into the float bowl constantly as I'm sure you know. Cutting off the main flow control by forcing the float to hold the needle closed all the time.. Originally Posted by pajeff02
Throttle plate looks good tho.. Looking forward to the finished toy..

Last edited by Smittro; 12-16-2010 at 01:25 AM. Reason: corrections in spelling
-
12-16-2010, 03:06 AM #107Veteran
- Join Date
- Feb 2009
- Location
- Mansfield, PA
- Posts
- 22,146
Black & Blue- '02 WS.6 / '07 Suburban
I will use a "blue thread paste" on the seat threads to ensure a good seal. The threads don't look terrible in the carb body despite the work it took to remove the seat.
-
12-16-2010, 03:53 AM #108its short but its skinny.
- Join Date
- Oct 2009
- Location
- The Woodlands/spring/houston
- Posts
- 2,142
pewter- 99 trans am
come hell or high water, youre gonna use that carb, huh? i commend you, sir. most would have just given up and bought a new one.
-
12-16-2010, 08:23 AM #109Veteran
- Join Date
- Feb 2009
- Location
- Mansfield, PA
- Posts
- 22,146
Black & Blue- '02 WS.6 / '07 Suburban
A numbers matching W-31 carb is a big ticket item. Really nothing wrong with the one I have -- it is just testing my patience. Originally Posted by jiveass
-
12-16-2010, 08:28 AM #110ʢ ൧ ൨ ൩ ൪ ൫ ൬ ൭ ൮Ր Ց Ւ Փ
- Join Date
- Feb 2009
- Location
- Pittsburgh
- Posts
- 9,963
White- 2008 Hummer H3
 I totally understand.. Heck I did take a band saw to my TB.. Originally Posted by pajeff02

-
12-16-2010, 08:40 AM #111Veteran
- Join Date
- Feb 2009
- Location
- Mansfield, PA
- Posts
- 22,146
Black & Blue- '02 WS.6 / '07 Suburban
Originally Posted by Smittro
Yep. You are one hardcore mo-fo when it comes to builds! How has progress been lately?
-
12-16-2010, 09:00 AM #112ʢ ൧ ൨ ൩ ൪ ൫ ൬ ൭ ൮Ր Ց Ւ Փ
- Join Date
- Feb 2009
- Location
- Pittsburgh
- Posts
- 9,963
White- 2008 Hummer H3
It's comming along.. Originally Posted by pajeff02
Gonna cut/prep header flanges prolly tonight or in the morning. Got the turbine inlet flanges and outlets ready. Then on to bending some 1-3/4 tubular steel for my header tubes. I'm going to use my trany as is and add an adaptor for the last 3 holes. The important holes between the quad bell and the LQ1 are a perfect match so it ends up not being the cluster I thought it would. Still have'nt desided on a clutch yet. Setup the PS pump in it's new location, and mount an electric water pump drive.. Have to finish milling my UI and bore out the fuel rails into the UI walls.. Then pull the front end off and prep for cleaning and painting under the hood.. Odds and ends mechanically after that. Then move to the interior. Have'nt settled on guages yet but I'm going full sweeps. The touch screen monitor handles the rest for AFR's and such..
- Sounds like alot but really it's not.. Suspensoin was replaced before she got parked so I'm good there.. I have everything else I need still in boxes so mostly just bolting stuff on and so forth.. I think I'm going to use the driver side heat vent in the hood as part of the CAI so some channeling there.. Little stuff you know..
Last edited by Smittro; 12-17-2010 at 08:47 AM. Reason: added back original post
Suggestion: If you are particularly irritated by another member's posting habits and are constantly fighting the urge to flame them, you can click on that person's profile, and select "Add to ignore list." This will make that person's posts invisible to you.
-
12-16-2010, 09:54 AM #113Senior Member

- Join Date
- Dec 2006
- Location
- Broken Arrow, Ok
- Age
- 59
- Posts
- 4,542
Arctic White- 2000 Z28
I am stunned you are having issues with it. I need to fly up there and do the Q-Jet rebuild for you... Originally Posted by pajeff02

-
12-16-2010, 05:58 PM #114Veteran
- Join Date
- Feb 2009
- Location
- Mansfield, PA
- Posts
- 22,146
Black & Blue- '02 WS.6 / '07 Suburban
Originally Posted by Z28Thunder
Just a few little things that want to be difficult. I enjoy a challenge, but right now I need to get this thing done and up to the builder so we can go play on the dyno.
Tonight I finished cleaning up the principle components and shot them with Eastwood's Carb Renew. While the first coat was drying I ran all the small parts that will be receiving a black oxide treatment through the wire wheel. If all goes well, I can start re-assembly tomorrow night and then get this thing in the mail next week.

-
12-16-2010, 07:02 PM #115Senior Member
- Join Date
- Dec 2006
- Location
- Broken Arrow, Ok
- Age
- 59
- Posts
- 4,542
Arctic White- 2000 Z28
I am a little surprised you had to use the Carb Renew. But the carb you have is what 29/30 + years old. And may never have had a rebuild done to it before. Originally Posted by pajeff02
-
12-17-2010, 03:11 AM #116Veteran
- Join Date
- Feb 2009
- Location
- Mansfield, PA
- Posts
- 22,146
Black & Blue- '02 WS.6 / '07 Suburban
Originally Posted by Z28Thunder
40 years old to be exact. The exterior of the carb was pretty nice, but kind of mottled with age so I opted to refresh it. Someone had been there before as 2 or 3 of the screws had witness marks from being manhandled. I just dressed the edges with a small file and ran them on a wire wheel to blend them back in.
-
12-17-2010, 08:39 AM #117dbl clutch'n like i shld

- Join Date
- Aug 2010
- Location
- Oklahoma City, Oklahoma
- Posts
- 1,807
sebring silver- Y2K SS CAMARO
[QUOTE=pajeff02;2517837]40 years old to be exact. The exterior of the carb was pretty nice, but kind of mottled with age so I opted to refresh it. Someone had been there before as 2 or 3 of the screws had witness marks from being manhandled. I just dressed the edges with a small file and ran them on a wire wheel to blend them back in.[/QUOTE]
going all out are we? you have got way more patience then i do brother i guess it just come with age
-
12-17-2010, 12:08 PM #118its short but its skinny.
- Join Date
- Oct 2009
- Location
- The Woodlands/spring/houston
- Posts
- 2,142
pewter- 99 trans am
[quote=WICKEDLS1;2518074]
damn, jeff....he jus call you old...... Originally Posted by pajeff02

-
12-17-2010, 12:11 PM #119Veteran
- Join Date
- Feb 2009
- Location
- Mansfield, PA
- Posts
- 22,146
Black & Blue- '02 WS.6 / '07 Suburban
To most of you guys... I probably am considered "old".
-
12-17-2010, 12:26 PM #120its short but its skinny.
- Join Date
- Oct 2009
- Location
- The Woodlands/spring/houston
- Posts
- 2,142
pewter- 99 trans am
Originally Posted by pajeff02
 ..................yea you old as hell...
 Well, not quite original. It be a stroked 375 c.i. with a roller cam, wearing "stock appearing camoflage".
 Reply With Quote
Thread Information
Users Browsing this Thread
There are currently 1 users browsing this thread. (0 members and 1 guests)
Similar Threads
-
Question: anybody familiar with the oldsmobile aurora.
By dav-02ws6-m6 in forum General HelpReplies: 25Last Post: 07-03-2012, 02:44 AM -
I need some '69 Oldsmobile Cutlass parts! (help!)
By FasstChevys in forum Classic MuscleReplies: 5Last Post: 10-27-2011, 12:06 PM -
F/S or Trade 1970 SS396 El Camino Project
By H8tulooze in forum Vehicles For Sale / TradeReplies: 0Last Post: 09-01-2008, 06:42 AM -
Any oldsmobile forums?
By TARZAN in forum Almost Anything GoesReplies: 5Last Post: 05-31-2007, 02:59 AM -
1970 oldsmobile cutlass convertible forsale
By z-28lover in forum Vehicles For Sale / TradeReplies: 0Last Post: 10-25-2006, 10:32 AM

Bookmarks