

Results 21 to 40 of 121
Thread: Front End Pedders Install (Pics)
-
01-16-2008, 11:30 AM #21Grand Imperial Wizard


- Join Date
- Aug 2005
- Location
- Texas Department of Corrections
- Posts
- 18,128
- Retired Outlaw Sum Bitch
Thanks bro....
-
01-16-2008, 11:57 AM #22Member

- Join Date
- Sep 2006
- Location
- Southeast
- Age
- 51
- Posts
- 646
Nothing special- Nothing special
Great write up, man.
Got a link to the work you did to the rear?
-
01-16-2008, 12:13 PM #23Grand Imperial Wizard
- Join Date
- Aug 2005
- Location
- Texas Department of Corrections
- Posts
- 18,128
- Retired Outlaw Sum Bitch
I'll do a pic write up....but man that rear end is not stock. We got the blow torches out a few times

-
02-20-2008, 05:33 AM #24Member
- Join Date
- Nov 2005
- Location
- Royal Oak, Michigan
- Age
- 51
- Posts
- 236
Black- 2004 GTO A4
Sarge - do you have a comprehensive list of all the suspension parts that you installed to fix the lazy steering (front & rear). Also, I don't see any of the pic's of your install. Thanks!
-
02-20-2008, 03:28 PM #25Grand Imperial Wizard
- Join Date
- Aug 2005
- Location
- Texas Department of Corrections
- Posts
- 18,128
- Retired Outlaw Sum Bitch
I see all the pics. Check your browser settings. I dunno....
Sure....in the front I replaced/upgraded the raidus rod bushings front and back, end link bushings, sway bar bushings and of course the strut bushings and bearings.
In the rear is the Harop Cover,Koni adjustables, all poly bushings,Pedders drag springs and this weekend I will be installing the Pedders Cross Member bushings. We have gone back to the "stock rear end" as the Ford rear end was a PITA and we just could not make it stay put. POS.....
-
02-24-2008, 10:49 PM #26rednariGuest
Good write up. Take it from me you will like the cross member bushings. They take the slack out of the drive line and make the car flatter in the corners. Do the subframe connectors too. After mine were welded in, I wished I had done it before!!
Also, did you do the Ford 88 conversion, and did I hear you say it was a bad setup?? Please shed some light on that issue.
-
02-26-2008, 03:51 AM #27Grand Imperial Wizard
- Join Date
- Aug 2005
- Location
- Texas Department of Corrections
- Posts
- 18,128
- Retired Outlaw Sum Bitch
Sure man....should have said "gave up" is more accurate. The brackets and a pumpkin out of a 93 Cougar in the junk yard....then it turned into a cluster fuck over the CV/stubs. After awhile I just said fuck it....I'll let somebody else "discover" the complete kit.....the other problem I had was the brackets just never did fit right...or should I say I wasn't comfortable with them....I hear there are some 10 sec GTO's out there running the 8.8....but I haven't tracked them down to ask the questions...what do you know or have heard?
Yeah I got the cross member bushings changed out....your not going to believe this....for three years I have been running around with no top bushing from the factory....they didn't install the top part of the bushing.....so hell yes the new Pedders bushings made a huge difference....
-
02-28-2008, 09:38 PM #28rednariGuest
I have not heard anything or read anything yet about 88 conversion performance whether via do it yourself or DSS kit. I read certain guys tried the conversion, but they have not posted any results. It certainly provides a variety of diffs and pinion sets that could improve ETs.
Get this, it has been said that the GTO OEM axle stubs fit into the 88 diff. Meaning they are of the same diameter and spline. The rub occurs when you attempt to bolt up the CV Shafts and find them too long because the 88 is wider than the OEM. I think the shafts could be shortened and rewelded correctly and with strength by a good DS shop. Thereafter, cryocvac the shaft for additional strength.
My thoughts are to purchase the hanger from DSS to avoid doing the engineering, and then install the GTO stubs and size up the shafts for trimming. I would of course take a stub to the yard or other scource for the 88 carrier, and check the fit before committing to the project. If the stubs fit, then it maybe a cheaper solution. Also, the shortened CV shaft will be stronger than stock if welded correctly.
-
05-11-2008, 02:13 PM #29230,55,147

- Join Date
- Jul 2005
- Location
- Houston
- Age
- 41
- Posts
- 3,664
Cyclone Grey Metallic- 2006 GTO


I've seen a company in Australia working on a 9" pumpkin that uses 9" ford pinion/ring gears and posi/spool units. I'm sure that would be pretty stout.
-
05-12-2008, 12:05 PM #30Suspension Specialist

- Join Date
- Jan 2008
- Location
- Michigan
- Posts
- 54
Red and Silver- 2004 GTO, 2008 G8 GT

Harrop has some quality bits in place for this application. There are good, but they are expensive....
-
05-12-2008, 12:05 PM #31Suspension Specialist
- Join Date
- Jan 2008
- Location
- Michigan
- Posts
- 54
Red and Silver- 2004 GTO, 2008 G8 GT
-
07-13-2008, 04:14 AM #32Senior Member

- Join Date
- Mar 2008
- Location
- OHIO"S only 9 second GTO
- Posts
- 1,464
Phantom Black Metalic- 2005 GTO
I assuminmg this is on a 04 car,my 05 has none of these mods,factroy shit aint wore out ,not yet.I have drove a few 04 cars brakes sucked.nice write up.
-
07-13-2008, 04:26 AM #33Grand Imperial Wizard
- Join Date
- Aug 2005
- Location
- Texas Department of Corrections
- Posts
- 18,128
- Retired Outlaw Sum Bitch
Same suspension. Dont have to be "wore out"....this is a great modification. Originally Posted by qwkgto

-
01-04-2009, 04:23 AM #34JMAC Racing

- Join Date
- Aug 2005
- Location
- Kentucky
- Posts
- 534
2000 Trans Am WS6 LS6- 2006 GTO LS2
 Hey Sarge, Great write-up. It helped me understand how to install these parts but I have one question. I keep reading this part over and over but can you make it simple which washers to install in what order? Originally Posted by Sarge
Thanks2010 Camaro
2006 GTO, LS2, 1 of 475
2009 Chevy Silverado

-
01-04-2009, 01:05 PM #35Grand Imperial Wizard
- Join Date
- Aug 2005
- Location
- Texas Department of Corrections
- Posts
- 18,128
- Retired Outlaw Sum Bitch
Sure...your spacer washers go behind ( towards the rear of the car) the big washer in the rear.
-
01-04-2009, 01:15 PM #36JMAC Racing
- Join Date
- Aug 2005
- Location
- Kentucky
- Posts
- 534
2000 Trans Am WS6 LS6- 2006 GTO LS2
Thanks Originally Posted by Sarge
 The big washer toward the rear or front of the car?
Last edited by WS6ICK; 01-04-2009 at 01:17 PM.
-
01-04-2009, 01:25 PM #37Impounded
- Join Date
- Oct 2007
- Location
- Beaver Dam KY
- Posts
- 7,745
79 T/A -91 Firebird- 1998 Trans Am -Oynx Black
Ill subscribed to this for one day I WILL have a goat
Great write up even tho ive had it bookmarked before..
-
01-05-2009, 03:18 AM #38Grand Imperial Wizard
- Join Date
- Aug 2005
- Location
- Texas Department of Corrections
- Posts
- 18,128
- Retired Outlaw Sum Bitch
OK...when you remove your original bushing you will have the radius rod sticking through a big hole in the frame. You put your big washer on first.Then your spacer (8mm/4mm etc) on. Then the bushing. Then the outer metal "brace" ( I use the sports setting). Originally Posted by WS6ICK
-
01-05-2009, 03:57 AM #39JMAC Racing
- Join Date
- Aug 2005
- Location
- Kentucky
- Posts
- 534
2000 Trans Am WS6 LS6- 2006 GTO LS2
OK got it, Thanks Sarge. Originally Posted by Sarge
-
01-05-2009, 04:43 PM #40BAHHBYE

- Join Date
- Jun 2006
- Location
- Gonzales, La
- Posts
- 2,861
06 PBM GTO(458WHP)SOLD!!- 06 TR GTO~476WHP 425TRQ
Hey Sarge i got an issue. I have the sway bar and RR bushings. When i was changing my tire the other day i noticed the end link on the driver side was completely off!! It was just hangin there. So im assuming the nut backed out for whatever reason. Well i got a nut and tried to reinstall it and the threaded stud at the knuckle is just free spinning. Im guessing my best bet is to go ahead and buy the complete end links from Pedders huh?

 Reply With Quote
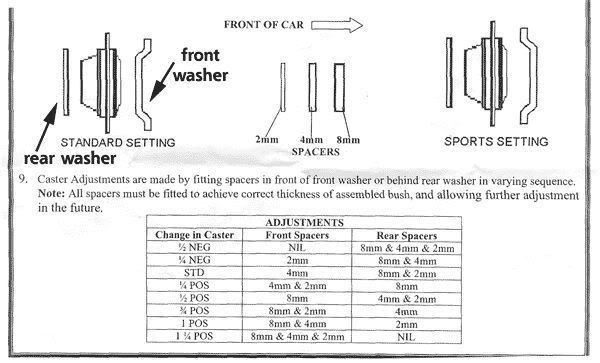
Thread Information
Users Browsing this Thread
There are currently 1 users browsing this thread. (0 members and 1 guests)
Similar Threads
-
Wings West front Lip Install
By Ramairgod84 in forum Appearance SectionReplies: 4Last Post: 10-28-2009, 06:08 AM -
Question: Front A-Arm Bushing install
By kool-aide in forum Suspension and HandlingReplies: 10Last Post: 06-12-2008, 02:19 PM -
Front Sway Bar Bushing Install
By surfinjoe in forum GTOReplies: 4Last Post: 04-07-2008, 05:19 AM -
INSTALL progress pics -- rear well box for 12" -- PICS
By fredmr85 in forum Stereo and ElectronicsReplies: 0Last Post: 05-28-2007, 12:37 PM -
Front strut install
By ZandSS in forum Suspension and HandlingReplies: 8Last Post: 05-19-2006, 11:59 AM

Bookmarks